Thursday, 7 August 2014

Ajax AutoCompleteExtender control example in asp.net using C#,VB.Net without using web service

IntroductionIn previous articles i explained Ajax AutoCompleteExtender control example in asp.net C#,VB.Net using web service and Ajax Accordion example to create Vertical DropDown menu and Drag & drop to upload multiple files using AjaxFileUpload like Facebook and Ajax TextBoxWatermarkExtender example and Show tool tip message using CSS and HTML and Highlight gridview row on mouse over using CSS andBind,Save,Edit,Update,Cancel,Delete and paging example in DetailsView and How to allow only numbers, characters in the textbox using FilteredTextBoxExtender control of Ajax in asp.net" and CalendarExtendar control of Ajax in asp.net 
AutoCompleteExtender control example of AJAX in asp.net using web service
Description: Have you ever noticed how the related suggestions highlights as youstart typing in the Google search box? This is called AutoComplete. So if you want Google type auto complete TextBox functionality then we can also implement this functionality in our asp.net web applicationsusing AutoCompleteExtender control of AJAX. AJAX is very powerful tool for improving performance, look and feel. 

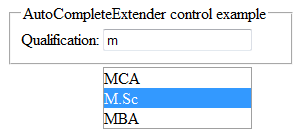
The concept is simple. When you start typing in the TextBox, AutoCompleteExtender fetches the matching strings from the database and display while typing e.g. when you type a single character ‘m’ in the TextBox then all the Qualifications starting with ‘m’ will be fetched  and displayed.

There are two ways to implement AutoComplete functionality:

1) Using Web Service 
2) Using Static Method 
  
In this example we will learn the second method i.e. using Static Method in the code behind file. First method i.e. using Web service was explained in the article Ajax AutoCompleteExtender control example in asp.net C#,VB.Net using web service

Implementation: Let's create an asp.net sample website to it in action.  
  •  Create  a DataBase in SQL Server e.g. "MyDataBase"and create a table in that DataBase and Name it "Qualification_ Table" as shown in figure below:

AutoCompleteExtender control example of AJAX in asp.net

  • Create ConnectionString in the web.config file as :
<connectionStrings>
    <add name="conStr" connectionString="Data Source=LALIT;Initial Catalog=MyDataBase;Integrated Security=True"/>
  </connectionStrings>

Note: Replace the Data Source and the Initial Catalog as per your application.

Place a ToolScriptManager from the AjaxControlToolkit toolbox and Place a TextBox control. Also drag AutoCompleteExtender control form Ajax toolkit onto the design page(.aspx)
Source Code:

<asp:ToolkitScriptManager ID="ToolkitScriptManager1" runat="server"></asp:ToolkitScriptManager>
       <fieldset style="width:250px;">
            <legend>AutoExtender control example</legend>    
        Qualification:    <asp:TextBox ID="txtQualifications" runat="server"></asp:TextBox>
        <asp:AutoCompleteExtender ID="AutoCompleteExtender1" runat="server"TargetControlID="txtQualifications" ServiceMethod="FetchQualifications"MinimumPrefixLength="1" CompletionSetCount="20" CompletionInterval="0"EnableCaching="true"></asp:AutoCompleteExtender>
            </fieldset>

Notice that on the design page(.aspx) a new directive:

<%@ Register Assembly="AjaxControlToolkit" Namespace="AjaxControlToolkit"TagPrefix="asp" %>

is automatically added on dragging the AutoCompleteExtender control form Ajax toolkit in the very second line just below the <@page> directive which is always very first line of the design page(.aspx).This means Ajax is now registered to be used.

The properties of AutoCompleteExpender control that are used in this example are as follows:

TargetControlID - The TextBox control where the user types content to be automatically completed e.g. In our case Qualification TextBox.

ServiceMethod - The web service method that we created for fetching the list of Qualifications from the database. 

MinimumPrefixLength - Minimum number of characters that must be entered before getting suggestions e.g. if you type ‘a’ then matching string starting with character ‘a’ will appear.

CompletionInterval - Time in milliseconds when the timer will kick in to get suggestions using the web service. Always keep it as low as you can so that it fetches the suggestion immediately. If you set CompletionInterval  =1000 then it means it  is set to 1 second because 1000 milliseconds =1 second.

EnableCaching – It is a Boolean property to check whether client side caching is enabled or disabled.

CompletionSetCount - Number of suggestions to be retrieved from the web service.
  • Now in the code behind file (.aspx.cs) create the static function to automatically Fetch Qualifications on typing in the Qualification TextBox. e.g. When you type a single character e.g. ‘m’ then all the Qualifications starting with ‘m’ will appear like suggestions.
C#.Net Code to implement auto complete on TextBox without using web service

Include the following namespaces:

using System.Data;
using System.Data.SqlClient;
using System.Configuration;
using System.Collections.Generic;

and then write the  code as:

[System.Web.Script.Services.ScriptMethod()]
    [System.Web.Services.WebMethod]
    public static List<string> FetchQualifications(string prefixText)
    {
        SqlConnection con = newSqlConnection(ConfigurationManager.ConnectionStrings["conStr"].ToString());
        con.Open();
        SqlCommand cmd = new SqlCommand("select * from Qualification_Table where Qualification like @QualName+'%'", con);
        cmd.Parameters.AddWithValue("@QualName", prefixText);
        SqlDataAdapter da = new SqlDataAdapter(cmd);
        DataTable dt = new DataTable();
        da.Fill(dt);
        List<string> QualNames = new List<string>();
        for (int i = 0; i < dt.Rows.Count; i++)
        {
            QualNames.Add(dt.Rows[i][1].ToString());
        }
        return QualNames;
    }

VB.Net Code o implement auto complete on TextBox without using web service
  • In the Code behind file (.aspx.vb) write the code as:
Include the following namespaces:

Imports System.Data
Imports System.Data.SqlClient
Imports System.Configuration
Imports System.Collections.Generic

Write the code as:

  <System.Web.Script.Services.ScriptMethod> _
<System.Web.Services.WebMethod> _
    Public Shared Function FetchQualifications(prefixText As StringAs List(Of String)
        Dim con As NewSqlConnection(ConfigurationManager.ConnectionStrings("conStr").ToString())
        con.Open()
        Dim cmd As New SqlCommand("select * from Qualification_Table where Qualification like @QualName+'%'", con)
        cmd.Parameters.AddWithValue("@QualName", prefixText)
        Dim da As New SqlDataAdapter(cmd)
        Dim dt As New DataTable()
        da.Fill(dt)
        Dim QualNames As New List(Of String)()
        For i As Integer = 0 To dt.Rows.Count - 1
            QualNames.Add(dt.Rows(i)(1).ToString())
        Next
        Return QualNames
    End Function

Asp.Net MVC 4 application to Create,Read,Update,Delete and Search functionality using Razor view engine and Entity Framework

Introduction: In this tutorial article you will learn How to create Asp.net MVC 4 web application having CRUD (Create, Read, Update, and Delete), View details and Search functionality using Razor view engine, Entity Framework(EF) and SQL SERVER Database.

Basically we will create an application to save, edit, update, list and search Book records.In previous articles i explained What is Asp.Net MVC? Its work flow,goals and advantages and The difference between Asp.Net Webforms and Asp.Net MVC.

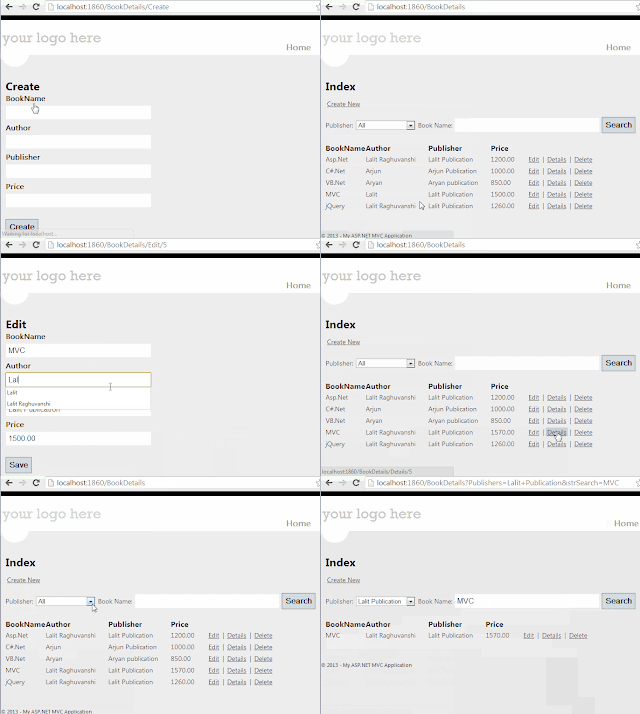
Below is the demo preview of the web application that we are going to build.
Asp.Net MVC Insert, Edit, Update, Delete, List and Search functionality using Razor view engine and Entity Framework
Click on image to view enlarged demo

Requirements: I am using Visual Studio 2010 for accomplishing this application. You needto install the following components before completing this application:
But if you are using Visual Studio 2012 then you don't need to install anything because it is having all the required components by default.
Implementation: Let's create our first Asp.Net MVC web application.
  • Open Visual Studio -> File -> New -> Project
  • Select you preferred language either Visual C# or Visual Basic. For this tutorial we will use Visual C#.
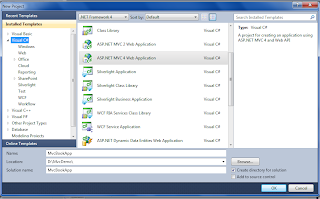
  • Name the project "MvcBookApp". Specify the location where you want to save this project as shown in image below. Click on Ok button. 
Asp.Net MVC Insert, Edit, Update, Delete, List and Search functionality using Razor view engine and Entity Framework
Click on the image to enlarge
  • A "New ASP.NET MVC 4" project dialog box having various Project Templates will open. Select Internet template from available templates. Select Razor as view engine as shown in image below. Click on Ok button.
Asp.Net MVC Insert, Edit, Update, Delete, List and Search functionality using Razor view engine and Entity Framework
Click on image to enlarge
It will add the required files and folder automatically as shown in image below.

Asp.Net MVC Insert, Edit, Update, Delete, List and Search functionality using Razor view engine and Entity Framework
Click on image to enlarge
Can you believe you have created your first MVC project without doing anything? But yes working MVC project is created having default template. 

You can run the application using F5 or from the Debug menu of Visual Studio select Start Debugging. You will see the page as shown below:

Asp.Net MVC Insert, Edit, Update, Delete, List and Search functionality using Razor view engine and Entity Framework
Click on image to enlarge

As we are using default template, you can see the links to the Home, About and Contact pages that are all functional.
But our aim is to create a web application to manage Book records. So we need to create the Model class that will automatically create the table in the database having the columns as mentioned in the form of properties in the class.

Creating Model

So let's create the model
  • Right Click on the Models folder of the project -> Add -> Class as shown in image below 
    Asp.Net MVC Insert, Edit, Update, Delete, List and Search functionality using Razor view engine and Entity Framework
    Click on image to enlarge
  • Name the class "BookDetail.cs"
And write the following code in the class BookDetail.cs :

using System;
using System.Collections.Generic;
using System.Linq;
using System.Web;
using System.ComponentModel.DataAnnotations;
using System.Data.Entity;

namespace MvcBooksApp.Models
{
    public class BookDetail
    {     
            [Key]
            public int BookId { getset; }
            public string BookName { getset; }
            public string Author { getset; }
            public string Publisher { getset; }
            public decimal Price { getset; }
        }
        public class BookDetailContext : DbContext
        {
            public DbSet<BookDetail> BookDetails
            {
                get;
                set;
            }
        }
    }

 Note: If you get the error "The type or namespace name 'DbContext' could not be found (are you missing a using directive or an assembly reference?) " then read the article "Error Solution:The type or namespace name 'DbContext' could not be found (are you missing a using directive or an assembly reference?)"
  • Now it's time to create the database. So launch SQL SERVER and create a database and name it "Books_DB"
  • In the web.config file of the root directory of our project, create the connection string in the <configuration> tag as:
<connectionStrings>
    <add name="BookDetailContext" connectionString="Data Source=lalit;Initial Catalog=Book_DB;Integrated Security=True"/>
  </connectionStrings>

Note: Replace the Data Source and Initial Catalog as per your application.
  • Build the project first before going further. Go to Build menu -> Build MvcBooksApp.
 Creating Controller

Next step is to create the controller   
  • Right click on the Controller folder -> Add -> Controller as shown below. 
Asp.Net MVC Insert, Edit, Update, Delete, List and Search functionality using Razor view engine and Entity Framework
Click on the image to enlarge

  • Name the controller "BookDetailsController" and Select the following options as shown in image below. 
Asp.Net MVC Insert, Edit, Update, Delete, List and Search functionality using Razor view engine and Entity Framework
Click on image to enlarge

 ·         Controller name: BookDetailsController.
·         Template: MVC Controller with read/write actions and views, using Entity Framework.
·         Model class: BookDetail (MvcBooksApp.Models)
·         Data context class: BookDetailContext (MvcBooksApp.Models)
·         Views: Razor (CSHTML).

Note: Model class and Data Context class will not appear until you build the project.

On clicking Add Button, Visual studio will create the following files and folder under your project.

  1. BookDetailsController.cs file in the Controllers folder of the project.
  2. BookDetails folder in the Views folder of the project.
  3. And also the Create.cshtml, Delete.cshtml, Details.cshtml, Edit.cshtml, and Index.cshtml in the Views\ BookDetails folder.
Congrats you have created the MVC application having Create, Read, Update and Delete(CRUD) functionality that the Asp.Net MVC automatically created so the phenomenon of creating CRUD action methods and views automatically is called Scaffolding.

Run the application using F5 and navigate to BookDetails controller by appending BookDetails to the URL in the browser: http://localhost:1860/Bookdetails/. You will see the page as shown in image below:

Asp.Net MVC Insert, Edit, Update, Delete, List and Search functionality using Razor view engine and Entity Framework
Click on image to enlarge
Clicking on "Create New" Button will open the screen as shown in image below.

Asp.Net MVC Insert, Edit, Update, Delete, List and Search functionality using Razor view engine and Entity Framework
Click on image to enlarge
Add the details and save some records e.g. as shown in image below:

Asp.Net MVC Insert, Edit, Update, Delete, List and Search functionality using Razor view engine and Entity Framework
Click on the image to enlarge
Clicking on "Details" button you can view the details of any particular record as shown in image below:
Asp.Net MVC Insert, Edit, Update, Delete, List and Search functionality using Razor view engine and Entity Framework
Click on image to enlarge
You can also edit any particular record by clicking on the "Edit" button at the bottom of the record details or come back to the main page by clicking on "Back to List" button.
From the main BookDetails page clicking on the Edit button enables you to edit the record as shown in image below
Asp.Net MVC Insert, Edit, Update, Delete, List and Search functionality using Razor view engine and Entity Framework
Click on the image to enlarge
Make the changes and update the record.
Similarly clicking on the "Delete" button allows you to delete the record.

Implementing Searching functionality
  • Now going further we will also implement the Searching functionality in this application so that we can search the book records by Publisher or Book Name.
So in the Views folder of the project -> BookDetails -> Index.cshtml
Add the following lines
 @using (Html.BeginForm("Index","BookDetails",FormMethod.Get))
        {    
         <p>Publisher: @Html.DropDownList("Publishers""All")  
           Book Name: @Html.TextBox("strSearch")  
         <input type="submit" value="Search" /></p>
        }
below the line @Html.ActionLink("Create New""Create")

So it should look like:

  @Html.ActionLink("Create New", "Create")
    @using (Html.BeginForm("Index","BookDetails",FormMethod.Get))
        {    
         <p>Publisher: @Html.DropDownList("Publishers", "All")  
           Book Name: @Html.TextBox("strSearch")  
         <input type="submit" value="Search" /></p>
        } 
  • In the Controller folder -> BookDetailsController.cs , comment or remove the code
public ActionResult Index()
        {
            return View(db.BookDetails.ToList());
        }
and add the method as:

public ViewResult Index(string Publishers, string strSearch)
        {
            //Select all Book records
            var books = from b in db.BookDetails
                           select b;

            //Get list of Book publisher
            var publisherList = from c in books
                           orderby c.Publisher
                           select c.Publisher;

            //Set distinct list of publishers in ViewBag property
            ViewBag.Publishers = new SelectList(publisherList.Distinct());

            //Search records by Book Name 
            if (!string.IsNullOrEmpty(strSearch))
                books = books.Where(m => m.BookName.Contains(strSearch));

            //Search records by Publisher
            if (!string.IsNullOrEmpty(Publishers))
                books = books.Where(m => m.Publisher == Publishers);
            return View(books);
        }
  •  Now time to run the application. Go to Controller folder -> HomeController replace the below index method
public ActionResult Index()
        {
            ViewBag.Message = "Modify this template to jump-start your ASP.NET MVC application.";
            return View();
        }
With the method
public ActionResult Index()
        {
            return RedirectToAction("Index""BookDetails");           
        }

Now run the application and you will see the results as shown in the image below:

Asp.Net MVC Insert, Edit, Update, Delete, List and Search functionality using Razor view engine and Entity Framework
Click on the image to enlarge