Introduction: In this tutorial article you will learn How to create Asp.net MVC 4 web application having CRUD (Create, Read, Update, and Delete), View details and Search functionality using Razor view engine, Entity Framework(EF) and SQL SERVER Database.
Basically we will create an application to save, edit, update, list and search Book records.In previous articles i explained What is Asp.Net MVC? Its work flow,goals and advantages and The difference between Asp.Net Webforms and Asp.Net MVC.
Below is the demo preview of the web application that we are going to build.
 |
| Click on image to view enlarged demo |
Requirements: I am using Visual Studio 2010 for accomplishing this application. You needto install the following components before completing this application:
Implementation: Let's create our first Asp.Net MVC web application.
- Open Visual Studio -> File -> New -> Project
- Select you preferred language either Visual C# or Visual Basic. For this tutorial we will use Visual C#.
- Name the project "MvcBookApp". Specify the location where you want to save this project as shown in image below. Click on Ok button.
 |
| Click on the image to enlarge |
- A "New ASP.NET MVC 4" project dialog box having various Project Templates will open. Select Internet template from available templates. Select Razor as view engine as shown in image below. Click on Ok button.
 |
| Click on image to enlarge |
It will add the required files and folder automatically as shown in image below.
 |
| Click on image to enlarge |
Can you believe you have created your first MVC project without doing anything? But yes working MVC project is created having default template.
You can run the application using F5 or from the Debug menu of Visual Studio select Start Debugging. You will see the page as shown below:
 |
| Click on image to enlarge |
As we are using default template, you can see the links to the Home, About and Contact pages that are all functional.
But our aim is to create a web application to manage Book records. So we need to create the Model class that will automatically create the table in the database having the columns as mentioned in the form of properties in the class.
Creating Model
So let's create the model
- Right Click on the Models folder of the project -> Add -> Class as shown in image below
 |
| Click on image to enlarge |
- Name the class "BookDetail.cs"
using System;
using System.Collections.Generic;
using System.Linq;
using System.Web;
using System.ComponentModel.DataAnnotations;
using System.Data.Entity;
namespace MvcBooksApp.Models
{
public class BookDetail
{
[Key]
public int BookId { get; set; }
public string BookName { get; set; }
public string Author { get; set; }
public string Publisher { get; set; }
public decimal Price { get; set; }
}
public class BookDetailContext : DbContext
{
public DbSet<BookDetail> BookDetails
{
get;
set;
}
}
}
Note: If you get the error "The type or namespace name 'DbContext' could not be found (are you missing a using directive or an assembly reference?) " then read the article "Error Solution:The type or namespace name 'DbContext' could not be found (are you missing a using directive or an assembly reference?)"
- Now it's time to create the database. So launch SQL SERVER and create a database and name it "Books_DB"
- In the web.config file of the root directory of our project, create the connection string in the <configuration> tag as:
<add name="BookDetailContext" connectionString="Data Source=lalit;Initial Catalog=Book_DB;Integrated Security=True"/>
</connectionStrings>
Note: Replace the Data Source and Initial Catalog as per your application.
- Build the project first before going further. Go to Build menu -> Build MvcBooksApp.
Next step is to create the controller
- Right click on the Controller folder -> Add -> Controller as shown below.
 |
| Click on the image to enlarge |
- Name the controller "BookDetailsController" and Select the following options as shown in image below.
 |
| Click on image to enlarge |
· Controller name: BookDetailsController.
· Template: MVC Controller with read/write actions and views, using Entity Framework.
· Model class: BookDetail (MvcBooksApp.Models)
· Data context class: BookDetailContext (MvcBooksApp.Models)
· Views: Razor (CSHTML).
Note: Model class and Data Context class will not appear until you build the project.
On clicking Add Button, Visual studio will create the following files and folder under your project.
- A BookDetailsController.cs file in the Controllers folder of the project.
- A BookDetails folder in the Views folder of the project.
- And also the Create.cshtml, Delete.cshtml, Details.cshtml, Edit.cshtml, and Index.cshtml in the Views\ BookDetails folder.
Congrats you have created the MVC application having Create, Read, Update and Delete(CRUD) functionality that the Asp.Net MVC automatically created so the phenomenon of creating CRUD action methods and views automatically is called Scaffolding.
Run the application using F5 and navigate to BookDetails controller by appending BookDetails to the URL in the browser: http://localhost:1860/Bookdetails/. You will see the page as shown in image below:
 |
| Click on image to enlarge |
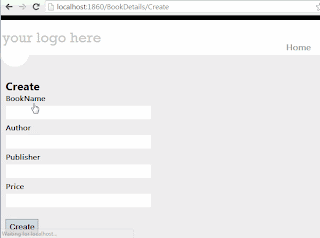
Clicking on "Create New" Button will open the screen as shown in image below.
 |
| Click on image to enlarge |
Add the details and save some records e.g. as shown in image below:
 |
| Click on the image to enlarge |
Clicking on "Details" button you can view the details of any particular record as shown in image below:
 |
| Click on image to enlarge |
You can also edit any particular record by clicking on the "Edit" button at the bottom of the record details or come back to the main page by clicking on "Back to List" button.
From the main BookDetails page clicking on the Edit button enables you to edit the record as shown in image below
 |
| Click on the image to enlarge |
Make the changes and update the record.
Similarly clicking on the "Delete" button allows you to delete the record.
Implementing Searching functionality
- Now going further we will also implement the Searching functionality in this application so that we can search the book records by Publisher or Book Name.
Add the following lines
@using (Html.BeginForm("Index","BookDetails",FormMethod.Get))
{
<p>Publisher: @Html.DropDownList("Publishers", "All")
Book Name: @Html.TextBox("strSearch")
<input type="submit" value="Search" /></p>
}
below the line @Html.ActionLink("Create New", "Create")
So it should look like:
@Html.ActionLink("Create New", "Create")
@using (Html.BeginForm("Index","BookDetails",FormMethod.Get))
{
<p>Publisher: @Html.DropDownList("Publishers", "All")
Book Name: @Html.TextBox("strSearch")
<input type="submit" value="Search" /></p>
}
- In the Controller folder -> BookDetailsController.cs , comment or remove the code
{
return View(db.BookDetails.ToList());
}
and add the method as:
public ViewResult Index(string Publishers, string strSearch)
{
//Select all Book records
var books = from b in db.BookDetails
select b;
//Get list of Book publisher
var publisherList = from c in books
orderby c.Publisher
select c.Publisher;
//Set distinct list of publishers in ViewBag property
ViewBag.Publishers = new SelectList(publisherList.Distinct());
//Search records by Book Name
if (!string.IsNullOrEmpty(strSearch))
books = books.Where(m => m.BookName.Contains(strSearch));
//Search records by Publisher
if (!string.IsNullOrEmpty(Publishers))
books = books.Where(m => m.Publisher == Publishers);
return View(books);
}
- Now time to run the application. Go to Controller folder -> HomeController replace the below index method
{
ViewBag.Message = "Modify this template to jump-start your ASP.NET MVC application.";
return View();
}
With the method
public ActionResult Index()
{
return RedirectToAction("Index", "BookDetails");
}
Now run the application and you will see the results as shown in the image below:
 |
| Click on the image to enlarge |
No comments:
Post a Comment